

Retrofit Speed Limit Info
Code your BMW G series yourself
Retrofit Speed Limit Info: What is SLI – and why is the G series different?
Speed Limit Info, SLI for short, is BMW's traffic sign recognition. In the G series you need an activation code and clean coding of three control units. First, let's take a quick look at how SLI works and why the old method from the F series no longer works.

Traffic sign recognition: camera and navigation
SLI shows you the applicable speed limit, no-overtaking zones and additional signs – such as “when wet” or time restrictions – directly in the instrument cluster. If you have a head-up display, the information also appears there.
The data comes from two sources: from the front camera in the mirror base and from the navigation data. In Europe the camera takes priority, and there is a simple reason for that. The map doesn't know about roadwork signs, while the camera sees nothing when the windscreen is iced up or the sign is covered in snow. Then the map steps in. That's why you should also keep your map updates current.
The camera is connected to its own control unit, the KAFAS. It is not part of the instrument cluster, BDC or head unit – this becomes important as soon as you start coding.

No more 8TH: why the F-series method doesn't work
Anyone who has already coded a BMW from the F series knows SLI as optional equipment 8TH. There you simply wrote it into the vehicle order (VO coding) and recoded the control units. Done.
In the G series, the SA 8TH no longer exists. There, SLI is part of the Driving Assistant package, and dealers don't retrofit it. So a VO code is out. Instead, you need a valid FSC code for the KAFAS and code the individual parameters via FDL.
The FSC is not an optional extra: without it, the instrument cluster shows only three dashes instead of the speed limit after coding. SLI only works with a valid FSC code and the correct FDL coding. As a BimmerCode user, you know FDL parameters from expert mode – they are the same parameters.
Requirements: Which KAFAS camera does your BMW have?
Before you buy anything, you need to know which KAFAS is in your car:
There's a catch with the G series: early models such as our G01 or the G30 pre-LCI do have the KAFAS 4 camera, but still use the certificate schema of the KAFAS 3. When switching to the new hardware, BMW initially kept the existing software structure. Only later KAFAS 4 variants (Mid/High, e.g. G05, G06, G07, G20, F40 and G30 LCI) work with their own App IDs. In both cases E-SYS shows you the control unit as KAFAS 4. That's why the App IDs decide which FSC you need – see the list below.
You also need Navigation Professional (SA609). On the G01 pre-LCI (2017–2021) the camera is fitted as standard, and in the G series it is found in practically every vehicle. SLI can be retrofitted on the G01, G02, G05, G06, G07, G11, G12, G15, G20, G21, G30, G31, G32, F40 and F90, among others.
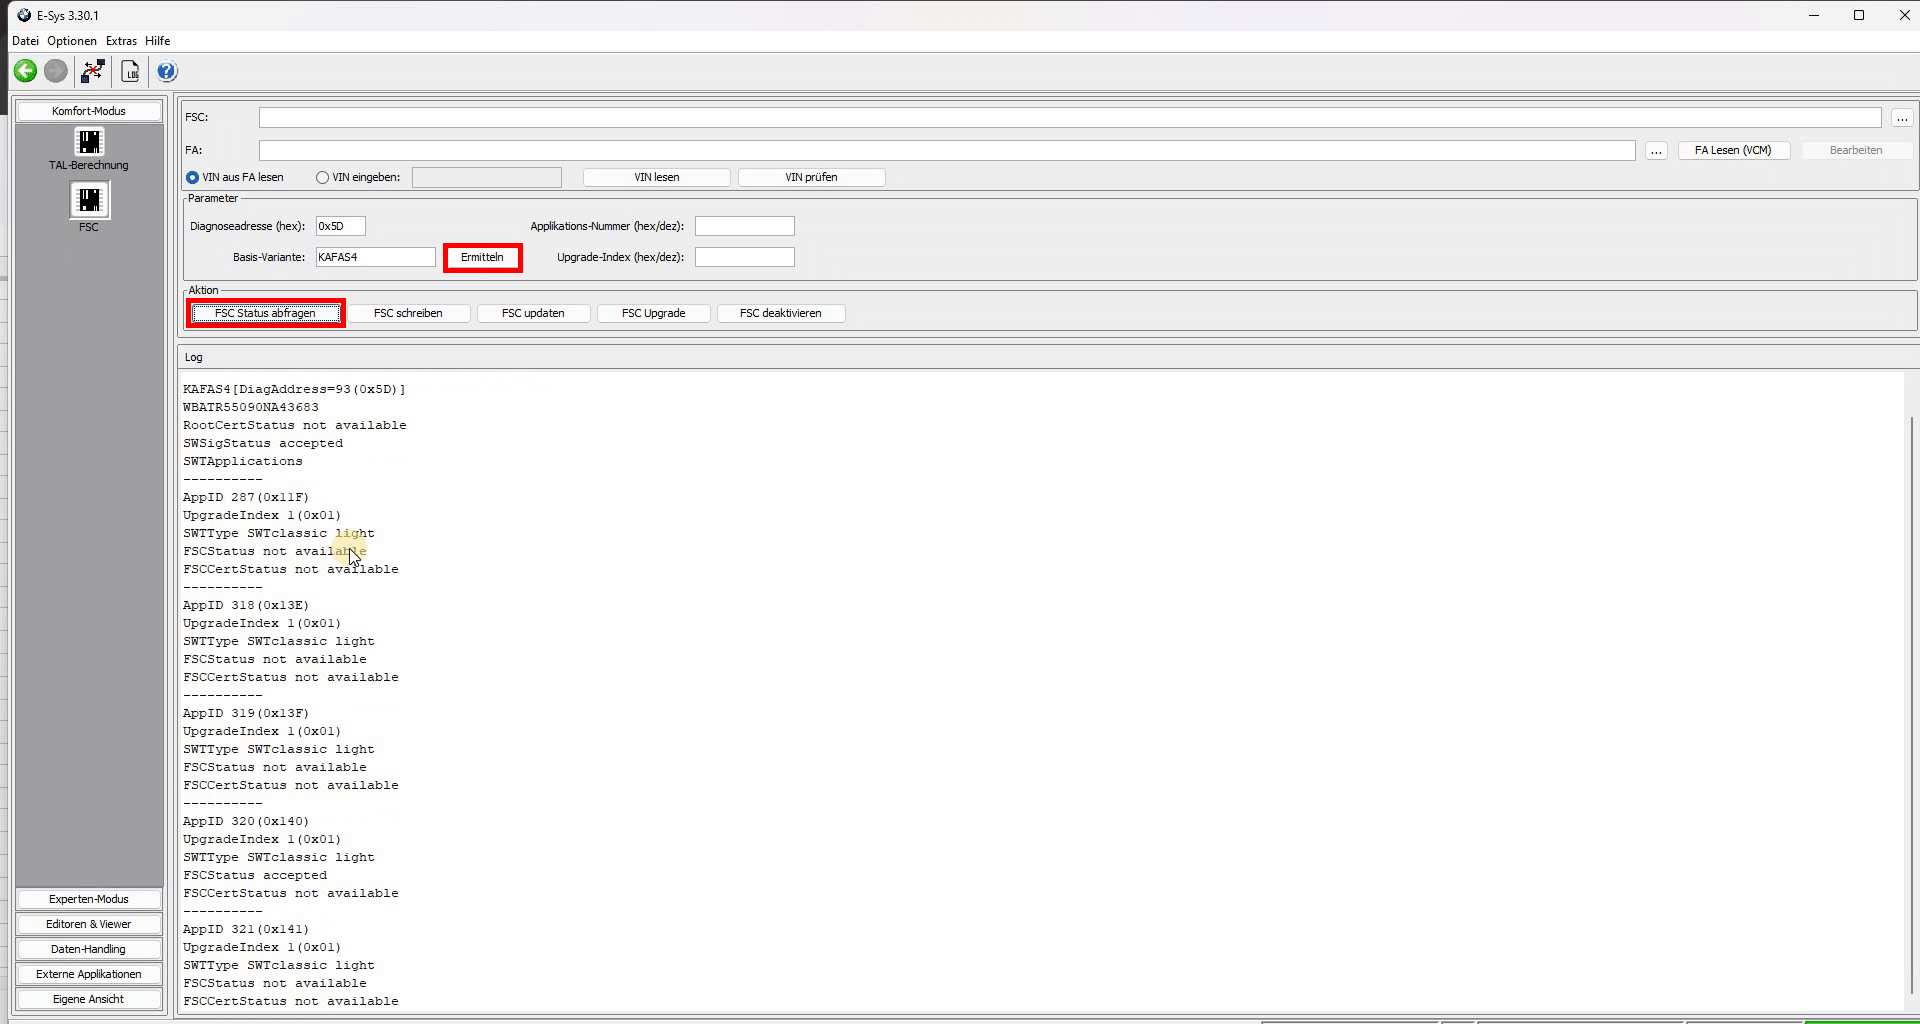
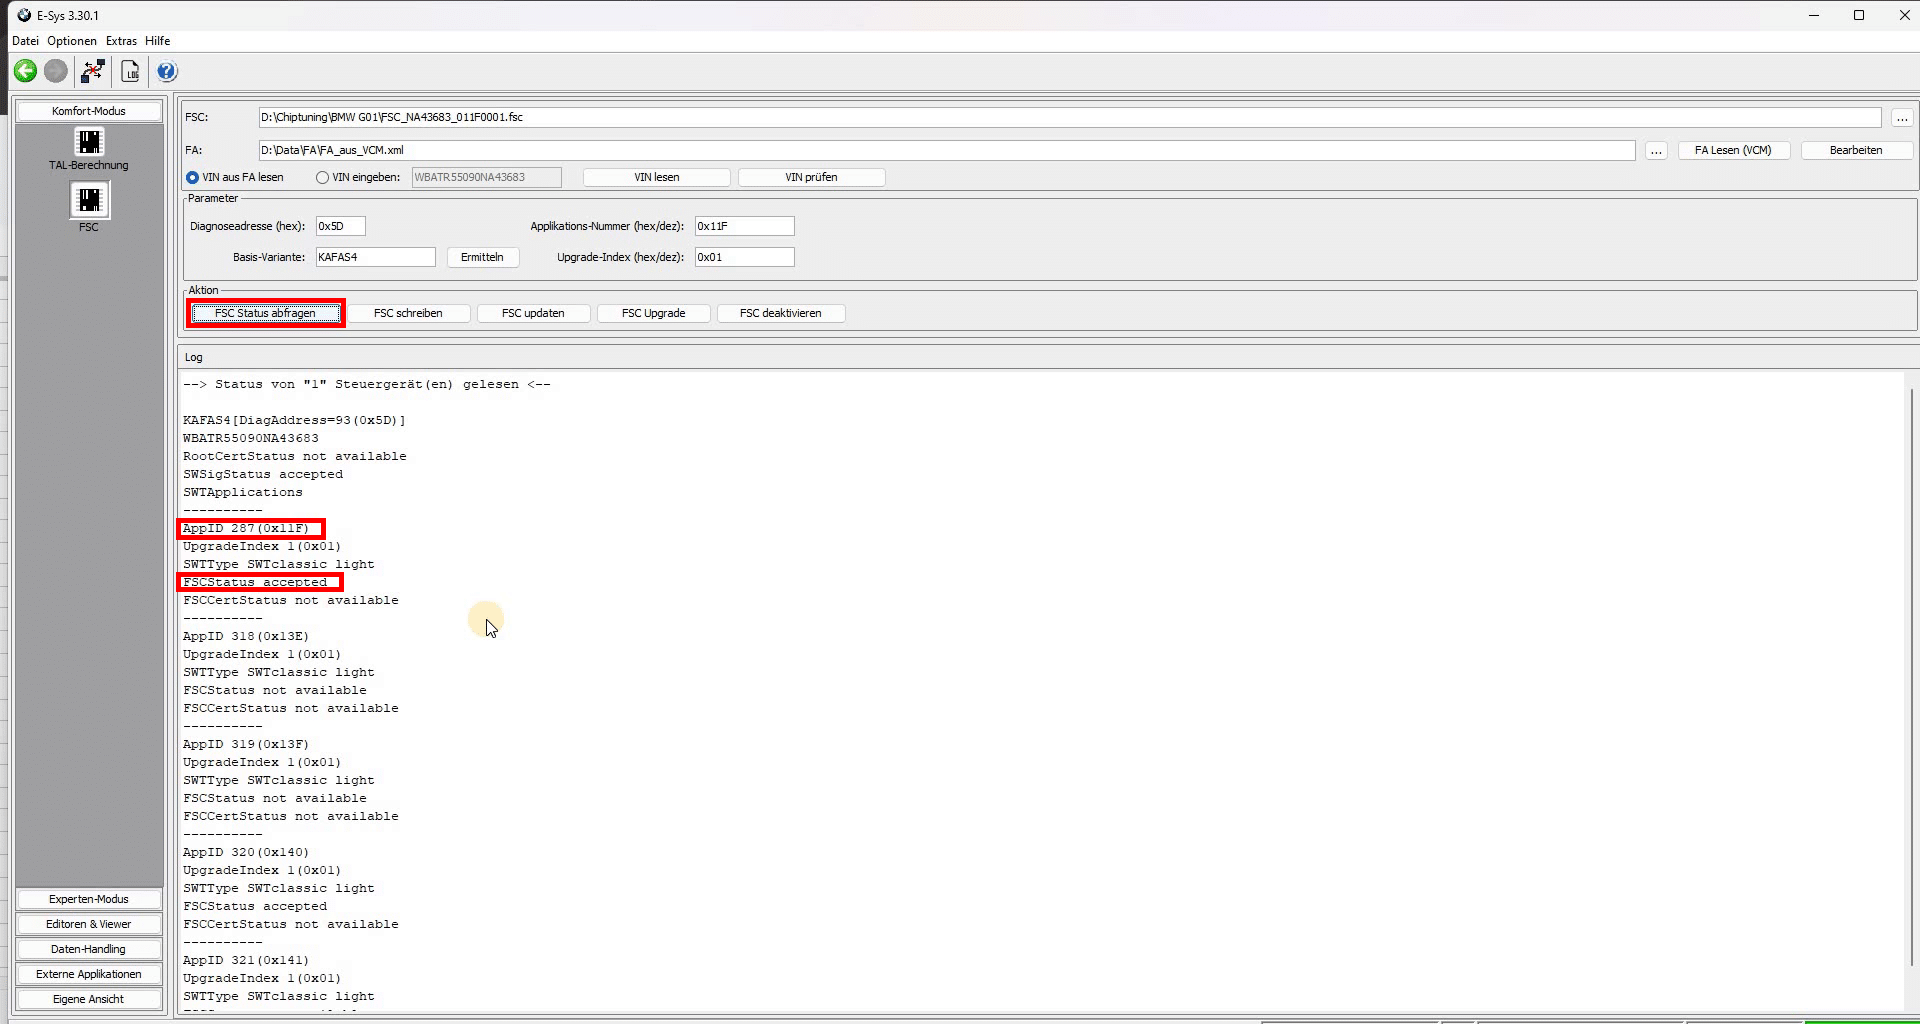
Finding out which KAFAS we have was, honestly, a pain. Only our own list and an FSC query in E-SYS brought clarity. Here's how to do it: in E-SYS under FSC, enter the diagnostic address 0x5D, click “Ermitteln” and then select “FSC Status abfragen”. If App ID 287 (0x11F) “Speed Limit Information SLI FSC Gxx” appears there, your KAFAS works with the KAFAS 3 schema. Otherwise, 334 (0x14E) or 331 (0x14B) will appear somewhere in the list. Either way, the FSC code works in both situations. In our case E-SYS showed “KAFAS4 [5D]”, yet the App IDs were those of the KAFAS 3. We show you how to connect E-SYS in step 1.

Depending on the KAFAS, the FSC query shows you these App IDs:
KAFAS 2 (E and F series)
KAFAS 3 schema (early G models, e.g. G01, G30 pre-LCI)
KAFAS 4 High/Mid (G05, G06, G07, G20, F40, G30 LCI)
What you need
You should have this ready:
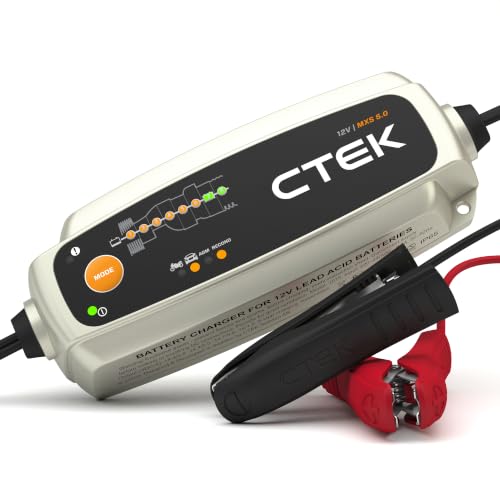
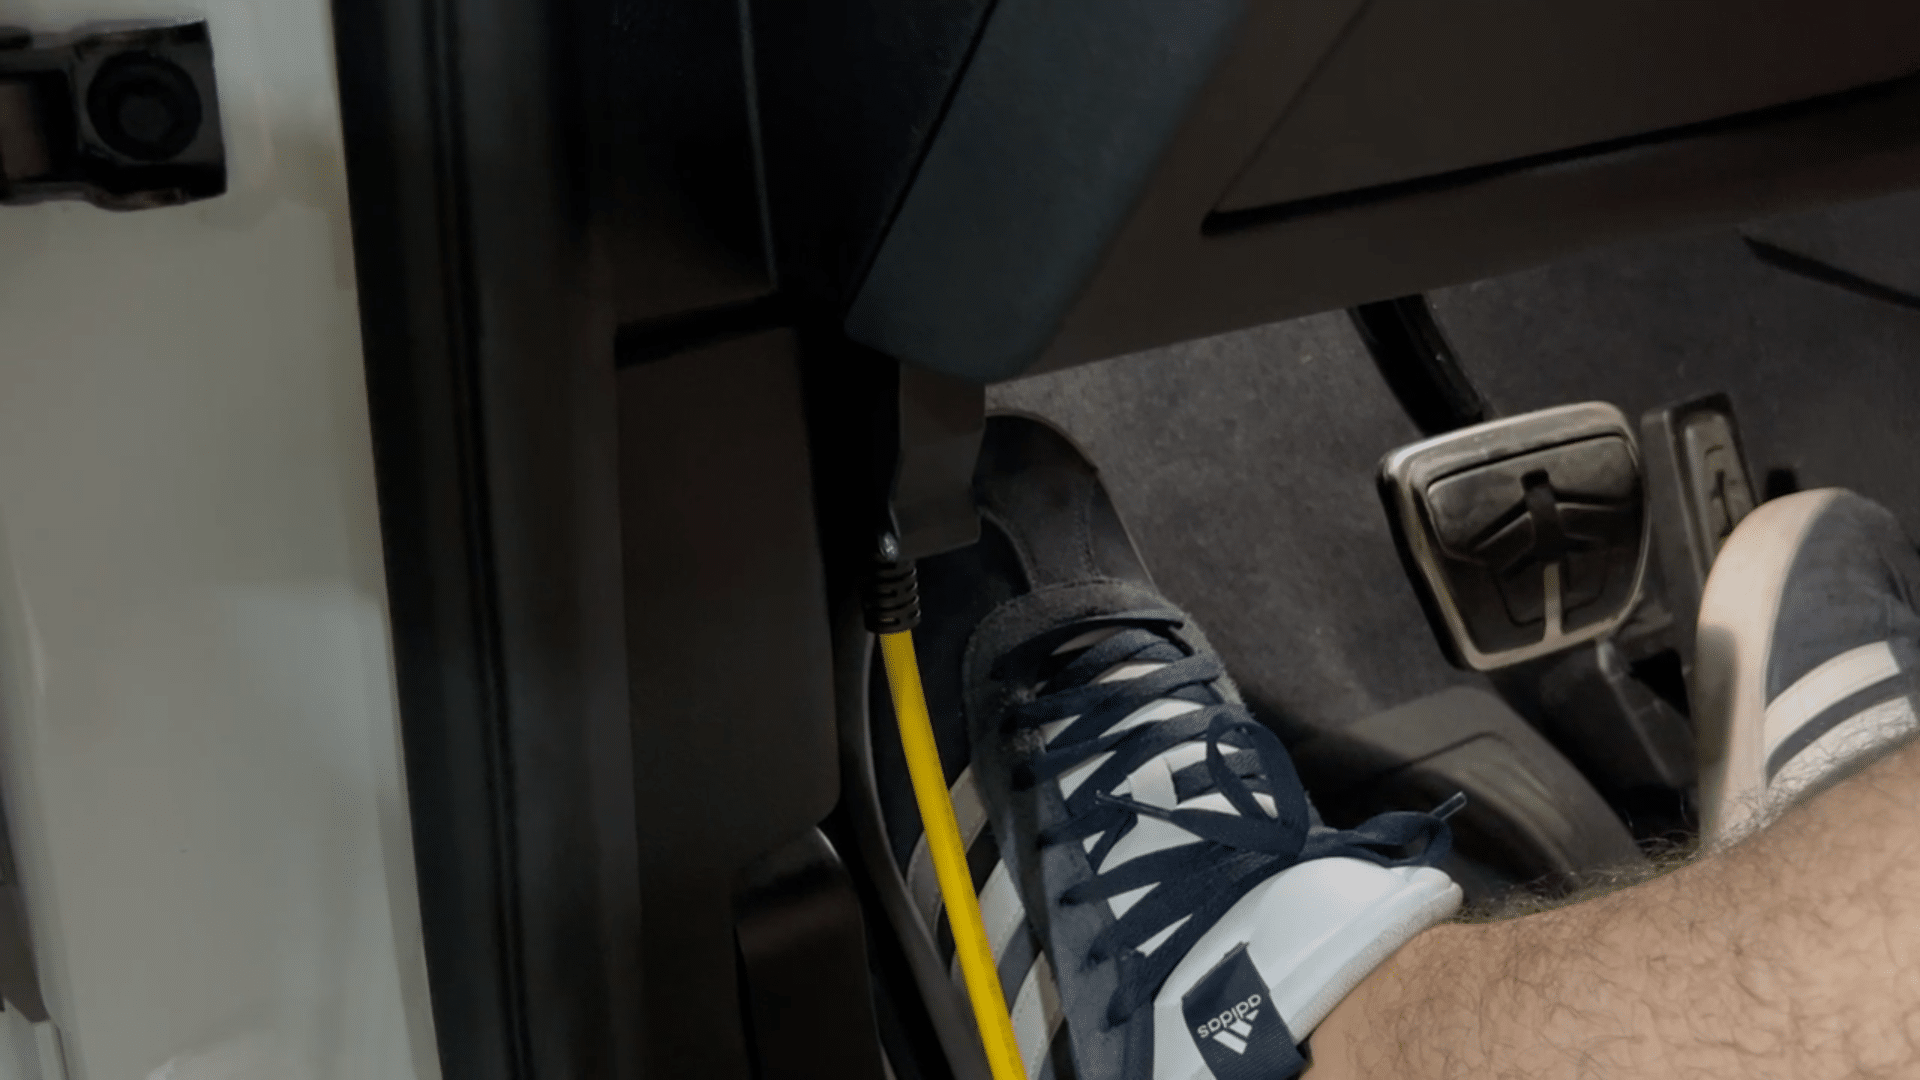
Don't go for the cheapest ENET cable* – a bad cable can endanger the control unit. A suitable charger is, for example, the CTEK MXS 5.0*:


By the way, we have compared in detail which software is suitable for which purpose: E-SYS and other coding software compared. Here we clearly chose E-SYS Ultra, because firstly we are used to it and secondly we need E-SYS for the FSC import anyway.
Buying the FSC code: where and for how much?
The biggest hurdle was finding an FSC code for the G series at all. We found it at baum-bmwshop24: there the FSC Speed Limit Info costs €56.00 incl. VAT plus shipping (as of September 2026). It is intended only for the G series, and delivery takes 1–5 days.
You receive the code for your VIN as a ZIP file. It contains three files:
Step 1: Set up E-SYS and connect it to the car
First: which program do you need for what?
You get both via E-SYS Ultra, which you buy directly from the provider. Its interface is called “Ultra Admin”, and from there you launch both E-SYS Ultra and regular E-SYS when needed.

How to establish the connection:
Now you see the list of all control units. The names may differ slightly depending on the model.
If you have already coded with E-SYS Ultra, the process will look familiar. It is the same as for coding Sport Plus and Comfort Plus.


Step 2: Import the FSC code into the KAFAS
Now the activation code goes into the KAFAS. Here's how: in E-SYS, switch to Komfort-Modus (comfort mode) and open FSC there.
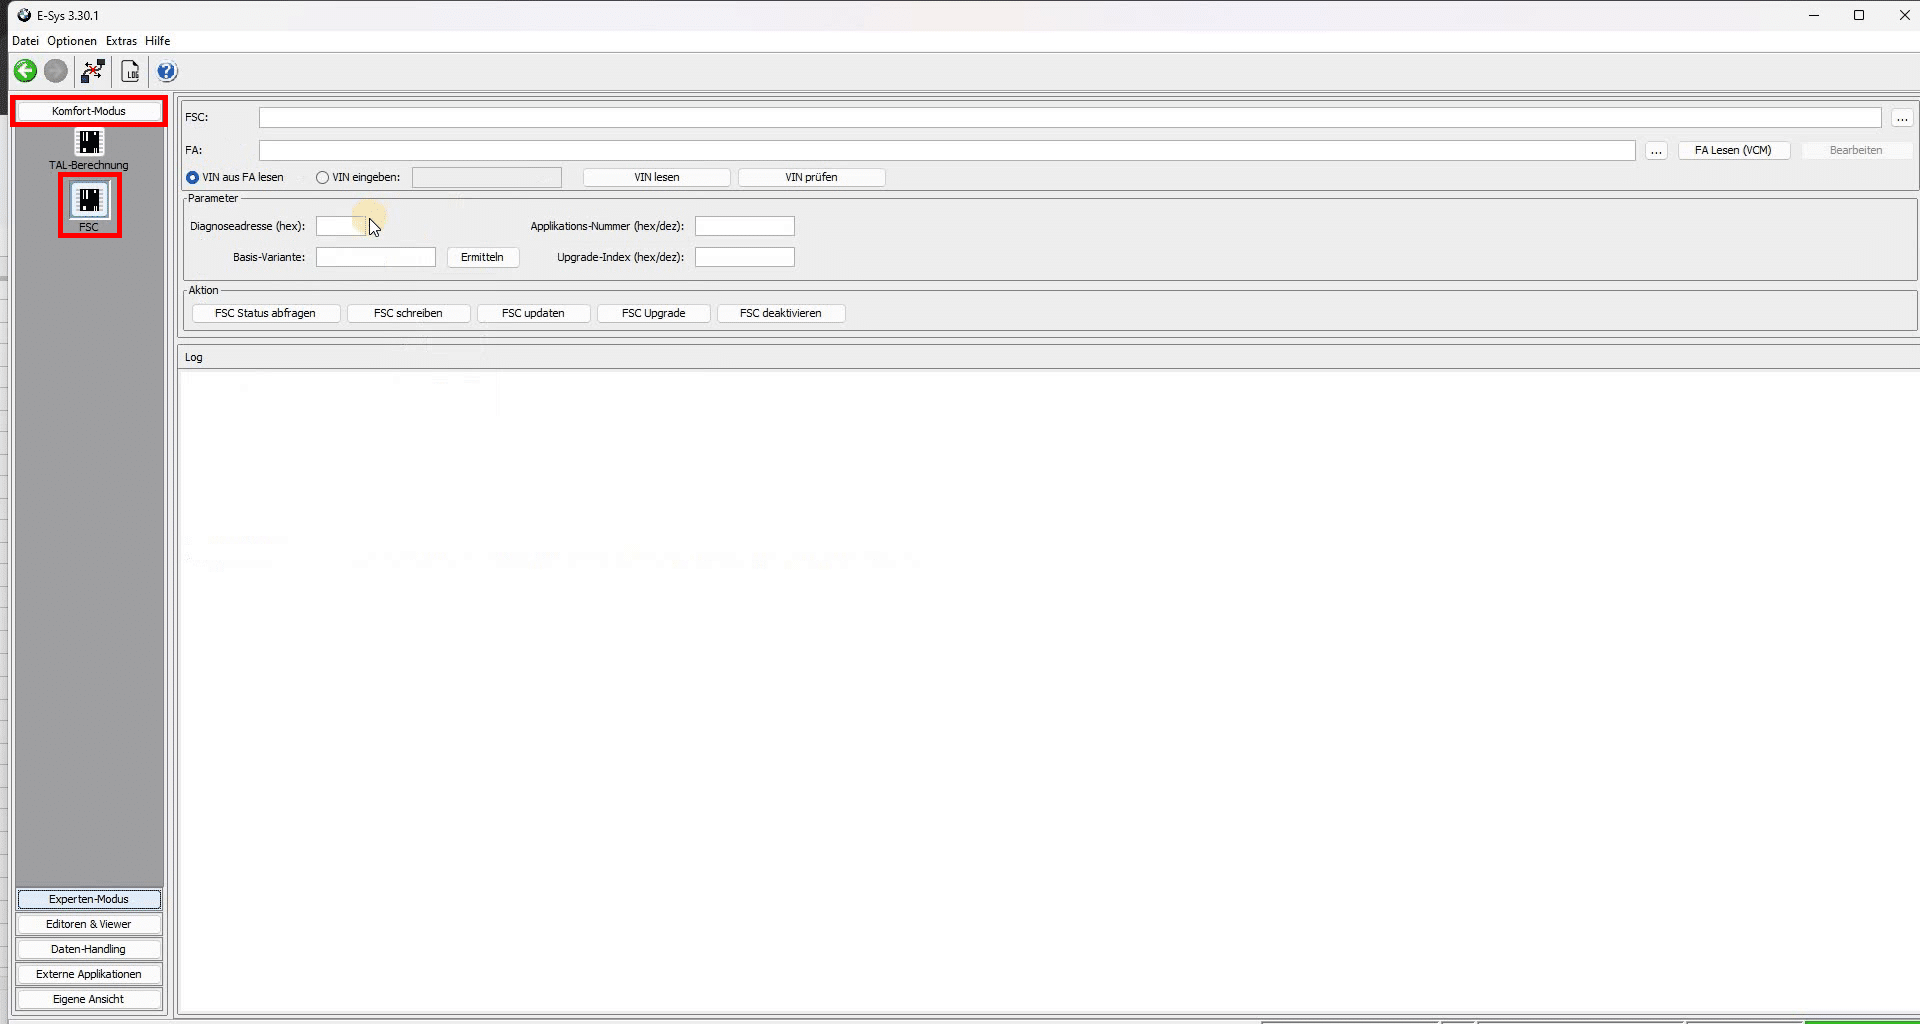
Enter the diagnostic address of the KAFAS: 0x5D. The address is the same for KAFAS 2 and KAFAS 4.
Click “Ermitteln” and then “FSC Status abfragen”. Depending on the KAFAS system, App ID 287 (0x11F), 334 (0x14E) or 331 (0x14B) should appear here (see the section above: Requirements: Which KAFAS camera does your BMW have?)
Now open the FSC file – the xxxxxxx_011F0001.fsc from the ZIP – and read out the vehicle order. Then click “FSC Upgrade”.
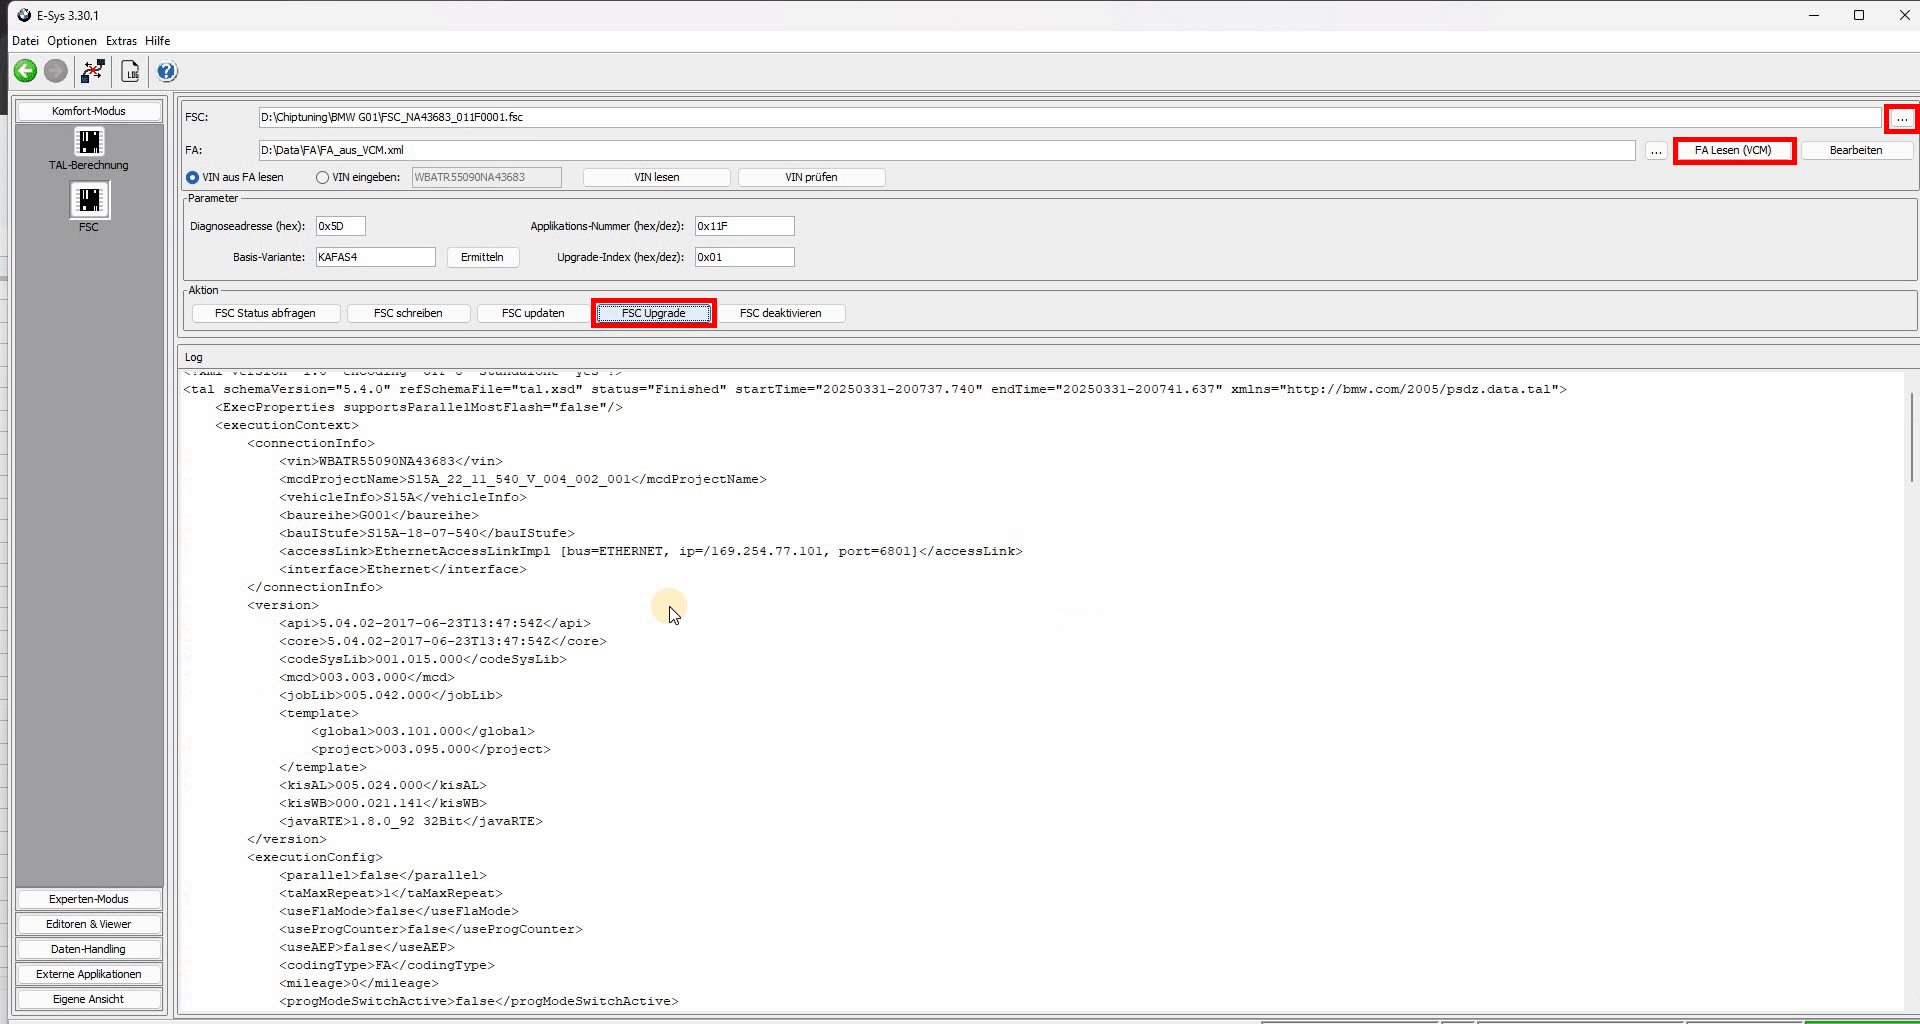
Finally, check the FSC status again. If the App ID now shows “accepted”, the KAFAS has accepted the code.
Very important: press “FSC Upgrade”, never “FSC updaten”. The two terms sound almost the same – only “FSC Upgrade” is correct.
We were able to import our file directly, no decoding needed. Some shops, however, deliver the FSC file Base64-encoded. In that case E-SYS only reads it after you have decoded it.
One more reason for the original FSC: fake codes are in circulation. The dealer diagnostic system ISTA detects them and blocks the function again, and you have to start all over again.
Step 3: Code the FDL parameters
The FSC alone does not yet bring a speed limit to the instrument cluster. Since the G series has no VO code as in the F series, you now code SLI parameter by parameter via FDL – in the head unit, in the KAFAS and in the instrument cluster. For this you use E-SYS Ultra or, alternatively, BimmerCode in expert mode. Both programs read and write parameters in all control units.
Besides the FSC, this was our second big hurdle: finding the truly correct FDL parameters. Our recommendation: code the complete list below. Superfluous parameters do no harm, and you make sure nothing is missing.
How to code each of the three control units:
Back up the coding data you have read before you change anything.
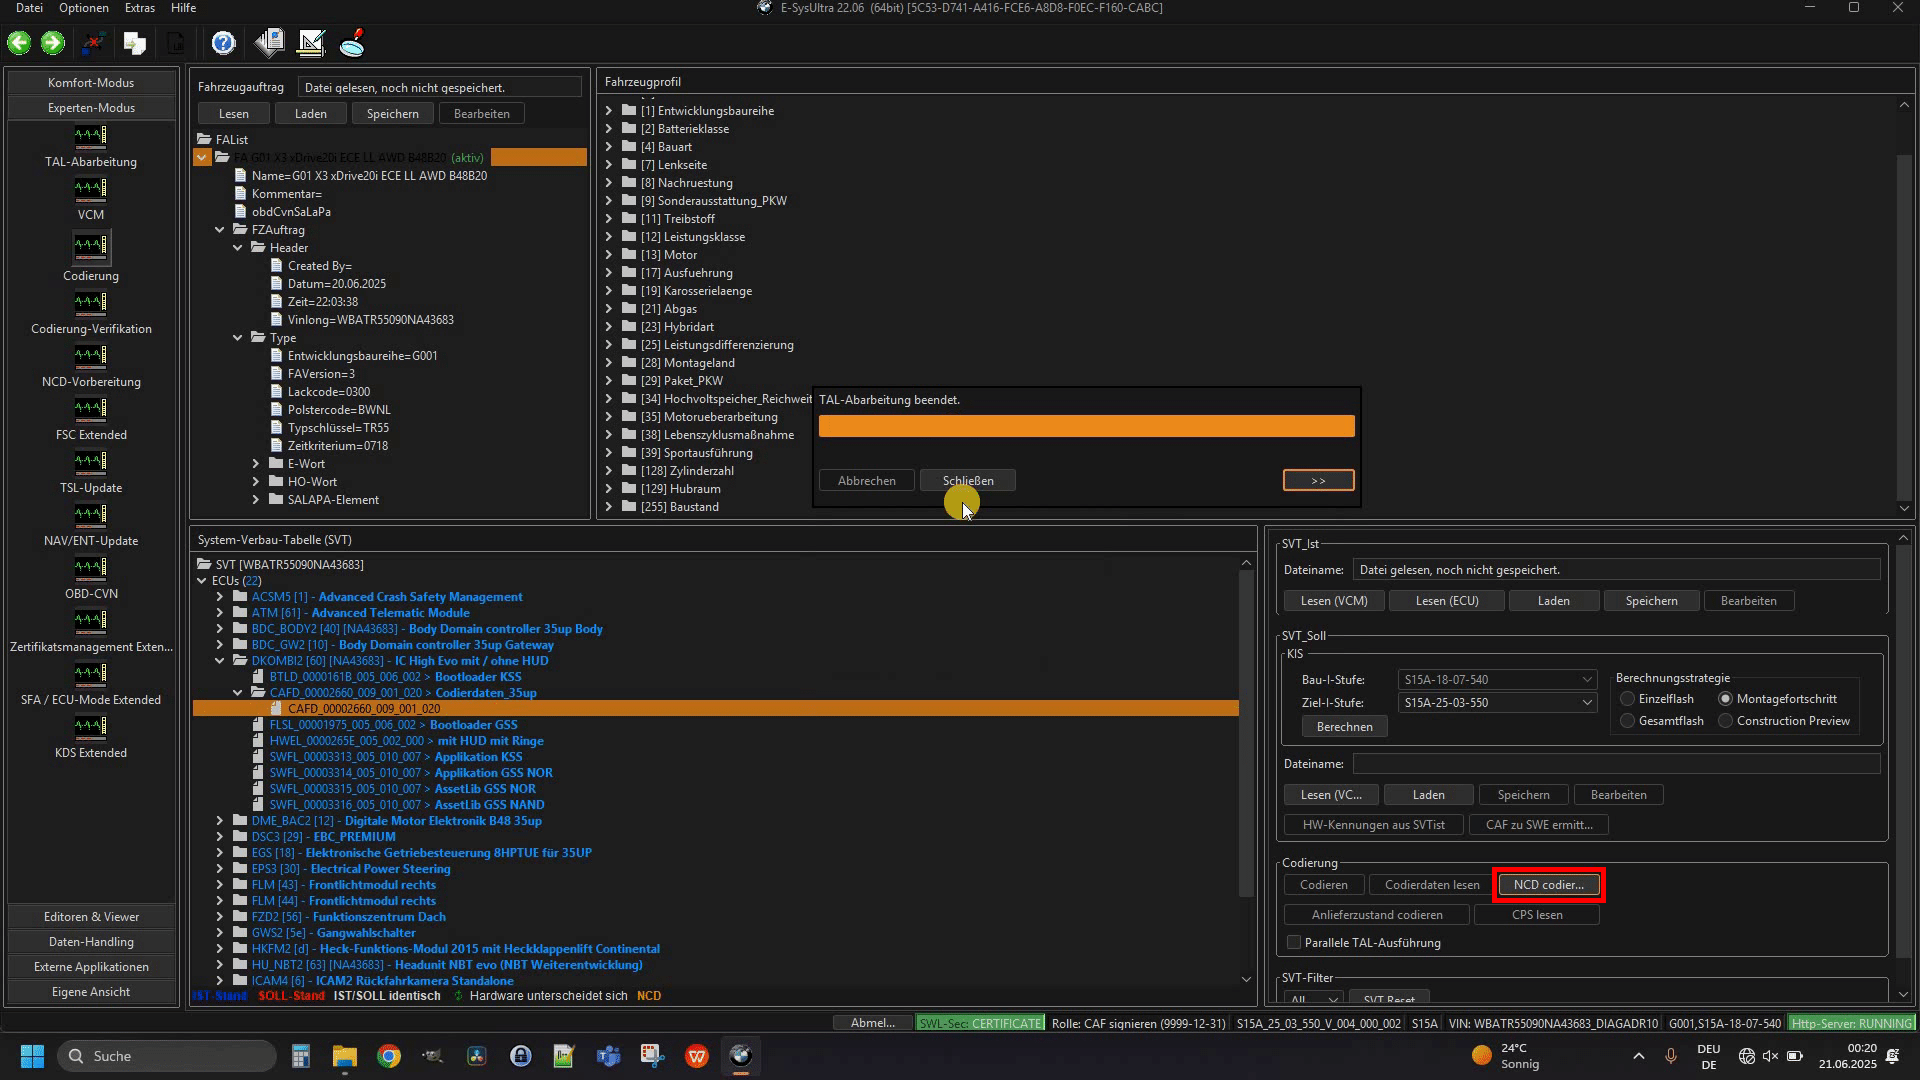
Head unit (HU_NBT2)
Our X3 has the HU_NBT2 head unit. Set these parameters here:
If your vehicle has an MGU, the control unit is called HU_MGU there.
KAFAS
In the KAFAS there are only two parameters:
Pay attention to the value: here it is called “initwert”, not “aktiv”.
Instrument cluster
The instrument cluster is where most of the work is. You always code the parameters in the upper half, and those marked “yes” additionally if your car has a head-up display.
| Parameter | Value | only with HUD |
|---|---|---|
CB_TACHOZEIGERBAND | aktiv [01] | |
NO_PASSING_ENABLE | aktiv [01] | |
PIA_SLI_NPI | aktiv [01] | |
PIA_TACHOZEIGERBAND | aktiv [01] | |
PIA_TACHOZEIGERBAND_PORTIERUNG | aktiv [01] | |
RCOG_TRSG_APPL | aktiv [01] | |
RCOG_TRSG_TIMEOUT | aktiv [01] | |
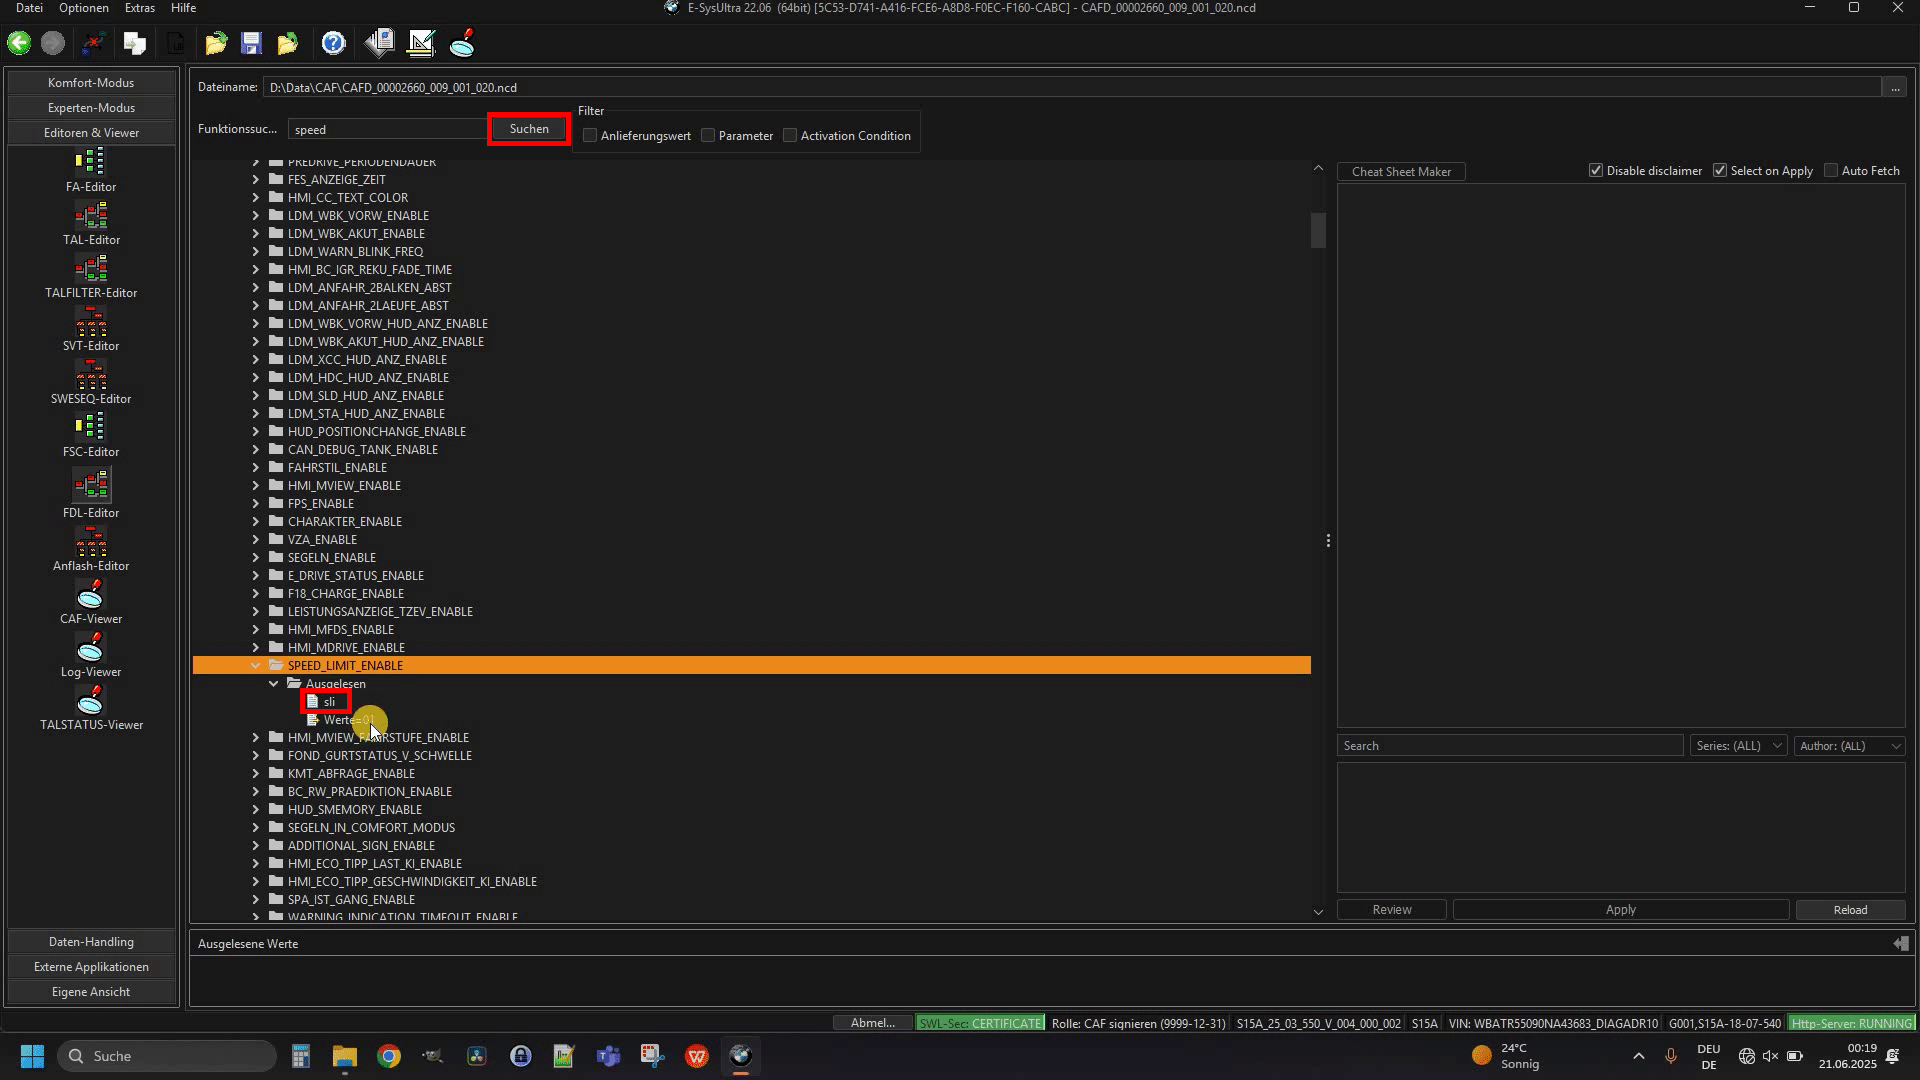
SPEED_LIMIT_ENABLE | sli [01] | |
TACHOZEIGERBAND_ENABLE | aktiv [01] | |
ADDITIONAL_SIGN_ENABLE | aktiv [01] | |
HUD_NO_PASSING_ENABLE | aktiv [01] | yes |
HUD_SPEED_LIMIT_ENABLE | aktiv [01] | yes |
PIA_HUD_SLI | aktiv [01] | yes |
PIA_HUD_SLI_NPI | aktiv [01] | yes |
PIA_HUD_SLI_PORTIERUNG | aktiv [01] | yes |
PIA_HUD_VSLI | aktiv [01] | yes |
SLI_PERMANENT_ENABLE | aktiv [01] – only set if the parameter exists in the instrument cluster | yes |
SLI_PERMANENT_ENABLE does not exist in every software version. If it is present in your instrument cluster, set it to aktiv [01].
Watch out with SPEED_LIMIT_ENABLE: here the value is called “sli [01]”, not “aktiv”.
Once all three control units are coded, restart the iDrive so the coding takes effect. To do so, hold the volume/power button down for about 30 seconds. After roughly 20 seconds, the system restarts.
Step 4 – Special: No orange speed in the HUD
This step only concerns you if your BMW has a head-up display. After coding, the HUD shows your speed in orange as soon as you drive above the speed limit. The problem: in daylight you can't see the orange in the HUD.
We searched a long time for the right parameter. We found it in the head unit, not in the instrument cluster:
You code it exactly as in step 3: read CAFD, edit NCD, set the value, save, NCD codieren. If the parameter is already set to aktiv from step 3, you are already done here. Then restart the iDrive as described.

The effect: a new option appears in the iDrive menu. You can now set yourself where exceeding the speed limit is shown to you:
This choice was important to us because the orange in the HUD gets lost in daylight.


Costs: activate it yourself or have it retrofitted?
The FSC code costs €56 plus shipping at baum-bmwshop24. At a coding service you pay €249 to €290 for the complete retrofit including FSC (all prices as of September 2026).
If you do it yourself, the software comes on top. E-SYS Ultra costs a little over €100 directly from the provider, so together with the FSC you end up at a little over €150.

Doing it yourself really pays off because you can use E-SYS Ultra for every further coding afterwards – and because you can recode yourself if an update resets your settings.
Typical mistakes and what happens after a workshop visit
For us it was a fairly trouble-free process. Still, there are a few pitfalls:
That leaves the workshop: a control unit update at the dealer can overwrite the coding – after that, SLI may be off again. If you do it yourself, you simply recode the parameters from step 3. The FSC is retained.
Conclusion: retrofitting Speed Limit Info is worth it
If you want to retrofit Speed Limit Info, you need two things in the G series: an original FSC for the KAFAS and the right FDL parameters in the head unit, KAFAS and instrument cluster. With E-SYS and E-SYS Ultra you can do it yourself in about 40 minutes.
With a HUD you shouldn't skip step 4. Only then do you decide yourself whether the red speedometer band or the HUD warns you.

While you're coding anyway, also take a look at how you can activate CarPlay via FSC. You can also find out how to code Sport Plus with a similar process here: coding Sport Plus and Comfort Plus.
Important: Coding is at your own risk. We accept no liability for damage to your vehicle. If you are unsure about any step, it's better to have the retrofit done by a service provider.
FAQ – Frequently asked questions about retrofitting Speed Limit Info
Affiliate links are marked with an *. When you buy one of these products, we receive a small commission. Nothing changes for you, and the offer/price stays the same.
More Articles
Do new cars have to be broken in? – What still applies today!
Breaking in a new carWhat still applies today – and what does not The new car is in the driveway, the odometer shows a…

Unlock Original BMW CarPlay – DIY, Cheap & Easy
Retrofitting BMW Apple CarPlay Yourself, Cheap & Easy You want to use Apple CarPlay in your BMW but do not feel like…

Does My BMW Have a WiFi Antenna?
Does my BMW have a WiFi antenna?Here is how to find out! Does your BMW even have a WiFi antenna? Especially anyone who wants Apple CarPlay…
